 |
Hi, my name is Funky & I am the creator of this tutorial which was written on Thursday February 26th 2009.
Resemblance to any other tutorial is purely coincidental.
I try to keep my tutorials set out as simply as possible for anyone new to making tags to be able to follow along. As usual I will be adding screenshots along the way.
All off site links will open in a new window, so when you've finished collecting your supplies, you can just kill that window & this page will still be open.
Supplies needed;
I am using Corel paint shop pro x2.......a trial version can be downloaded here.
No outside filters or masks were used in the making of this tutorial.
I am using the pay to use (PTU) Tagger sized KACI’S CASTLE scrapkit from Laura at Laura's designz. You can get that from Laura's site.
The tube is a FTU tube which you can collect that here It comes in a .psp file with 2 layers, be sure to hold onto the top layer as we’ll be adding that after the tag is completed in order to give proper credit. If the tube is one of yours & I shouldn’t be offering it as part of my supplies, please email me & I’ll correct it.
The font is called Fairytale which you find in my supply zip….. just have that opened up & ready for when we want to use it. I wouldn’t install it into your PSP programme as the more fonts you have installed, the slower your programme will run.
Okay hunnie bunnies, let’s hit this shall we.......
This isn’t actually a difficult tag to make it just looks like loads of instructions because of the screenshots included.
Open a new image size 700x560…….this gives us plenty to work from & we can resize later.
Go up to File & save as a .psp file – remember to save often so you don’t lose your work .
Open paper “LD_KC_Paper_1” into your psp programme.
Edit – Copy…..close off that paper.
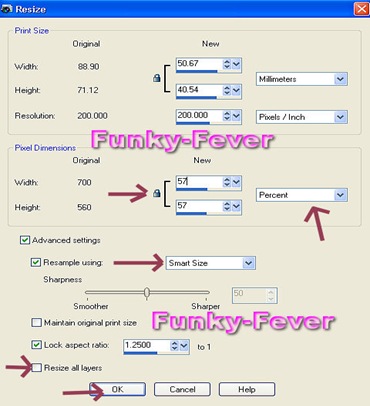
Back up to Edit – Paste as new layer – Image – Resize – Resize to 57% with “all layers” UN-ticked. Smart size selected. See screen shot below.
Image – Free rotate – Rotate left by 30 & hit OK……see screenshot below for settings.
Effects – Texture effects – Mosaic antique.
Symmetric ticked – Grid settings – 41; Tile diffusion – 37; Grout width – 1; Grout diffusion – 50; Hit OK
Adjust – Sharpness – Sharpen
Effects – 3D – Drop shadow & apply the settings below.
Vertical & Horizontal – 3; Opacity – 53; Blur – 10.14; Colour black (#000000) Hit the OK button.
Open LD_KC_Paper_13
Edit – Copy, then close that paper out.
Edit – Paste as new layer – Image – Resize – 50% with “all layers” UN-ticked
Effects – Texture effects – Mosaic antique…..just hit the OK button as the settings will already be in place from before.
Up to Adjust – Sharpness – Sharpen
Apply the same drop shadow as you did for the first paper.
File – Hit Save
Open LD_KC_RoundFrame1
Edit – Copy & close off the frame.
Back up to Edit – Paste as new layer.
Image – Resize – Resize to 40%
Adjust – Sharpness – Sharpen
Now grab your mover tool & move the frame to the top left hand corner…….Check the screenshot included below if you need to.
Grab your Magic wand & apply these settings.
Mode – Add shift; Match mode – RGB Value; Tolerance – 0; Use all layers – UN-ticked; Contiguous – ticked; Feather – 0; Anti-Alias – ticked.
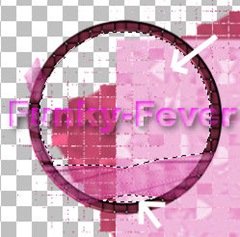
Now still working on the LD_KC_RoundFrame1, use your magic wand to click inside the frame so you get what looks like little marching ants…….at the bottom of the frame you’ll notice that there aren’t any marching ants there, so click on that part as well.
Now go up to Selections – Modify – Expand by 1 pixel, then hit the OK button
Open up LD_KC_Castle_1
Edit – Copy & close out the Castle image.
Back up to Edit – Paste into selection.
Selections – Select none.
Effects – 3D – Drop shadow with the settings below.
Vertical & Horizontal – 2; Opacity – 40; Blur – 5.00; Colour – black (#000000)
File – Hit save.
Now we want to open the tube you’ve chosen to use. If you’ve chosen to use the same as me then once you’ve opened it, go to Edit – Copy – minimise that tube now as we’ll be coming back to that later on when we’re ready to add the credit on your finished tag.
Edit – Paste as new layer
Up to Image – Resize – Resize to 40% All layers UN-ticked.
Adjust – Sharpness – Sharpen
Apply the same drop shadow that you applied to the frame above.
Grab your mover tool again & bring your tube down to where I’ve placed mine just in the bottom left hand corner.
Open up LD_KC_Dragon_2
Edit – Copy & close that image out.
Edit – Paste as new layer.
Image – Resize – Resize to 40% remembering to have all layers UN-ticked.
Adjust – Sharpness – Sharpen
Apply the same drop shadow as you did to the tube & frame above.
Vertical & Horizontal – 2; Opacity – 40; Blur – 5.00; Colour – black (#000000)
Open up the LD_KC_HEART WAND image – go to Edit & hit on Copy, close that image out.
Edit – Paste as new layer
Image – Resize – Resize to 40%
Adjust – Sharpness – Sharpen
Apply the same drop shadow as above, then grab your mover tool & move the image to the bottom left hand corner as in the screen shot supplied.
Open the LD_KC_MAGICAL_WORDART image
Edit – Copy & close out that image.
Edit – Paste as new layer
Image – Resize – Resize to 40% all layers UN-ticked
Image – Free rotate – Direction – Left by 17 with all layers UN-ticked.
Adjust – Sharpness – Sharpen.
Effects – 3D – Drop shadow & just hit OK as the settings will already be in place from before.
Grab your mover tool & move it to the top right of your circular frame.
Go to File & hit the save button.
Open the LD_KC_CROWN_1 & close out that image.
Back up to Edit & paste as a new layer.
Image – Resize – Resize to 30% all layers UN-ticked.
Adjust – Sharpness – Sharpen.
Effects – 3D – DropShadow – just hit the OK button as the settings are already in place from before.
Now grab your mover tool & position the crown on top of the letter M. See screen shot.
Now we’re going to add the fairy, you can choose which one you’d like here but I used LD_KC_PRINCESS_2
Edit – Copy – close out that image.
Back up to Edit & paste as new layer.
Image – Resize – Resize to 20% all layers UN-ticked.
Adjust – Sharpness – Sharpen.
Effects – 3D – DropShadow – apply as before.
Open the LD_KC_GLASS SLIPPER_4
Edit – Copy – close out that image.
Back up to Edit & paste as a new layer.
Image – Resize – Resize to 20% all layers UN-ticked.
Apply the same drop shadow as before.
Grab your mover tool & move your glass slipper to where I’ve placed it in the screen shot below.
File – save
Open the LD_KC_BUTTERFLY_4
Edit – Copy & close it out, back up to Edit & paste as new layer.
Image – Resize – Resize to 50%
Adjust – Sharpness – Sharpen. Add the same drop shadow as we’ve been applying all along & with your mover tool place it in the right hand corner of your tag. Now you want to open the LD_KC_BUTTERFLY_2 & copy it before closing it out.
Go back up to Edit & paste as a new layer.
Image – Resize - Resize to 40%
Sharpen & apply the drop shadow as before.
Position that just under the first butterfly then open up & copy the LD_KC_BUTTERFLY_3 then close that image out. Back up to Edit – Copy & paste as new layer.
Image – Resize & resize to 30%
Sharpen & apply the drop shadow. Then place it just under the the last butterfly you did.
Phew! we’re nearly done now **giggles**
Open the LD_KC_ROSE_2 & copy it before closing it out, then paste as new layer ready to resize to 35% – Sharpen & apply the drop shadow as before.
Place it next to the dragon so the rose is falling just under his nose.
Open & copy the LD_KC_HEARTBUTTON_2 Close it out & paste as new layer. Resize to 50% & rotate it by 17 to the left – Sharpen & apply the drop shadow. Place it at the tip of the rose stem.
Open & copy LD_KC_HEARTBUTTON_3 & paste as new layer.
Resize to 40%, Sharpen & apply the drop shadow
Open & copy LD_KC_CRYSTAL_1
Paste as new layer & resize to 10%
Sharpen & apply the drop shadow then place it on the two hearts.
Open the last element LD_KC_FAIRYPRINCESS_WORDART
Copy & paste as new layer – resize to 40% – Sharpen & apply the drop shadow then place it at the foot of the dragon.
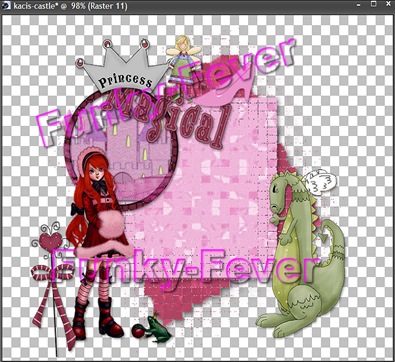
Maximise the tubed image we used & copy the top layer, then paste as new layer onto your tag. Resize by 60%, rotate to the left by 90, Sharpen & apply a drop shadow. Position it to the left of the tube. See screen shot for what you should now have.
Layers – add a new raster layer.
Now we’re going to add the name you’d like on your tag.
Grab your text tool & follow the settings in the screen shot provided.
Right click on your tag & write the name you’d like in the little box that flies open, click apply. Go to image & rotate by 22 – Selections – select none – Sharpen – Apply the drop shadow that we’ve used all along. Move the name to where you would like it to be. Now close off the font that you’ve had opened up as we’ve finished with that.
Go to your layer palette & on any layer – right click, then on the options that fly open, choose merge – merge as visible.
Now up to Selections – Select all – Float – image – Crop to selection.
File – Save as a .png for an invisible background.
That’s it guys, you’re all done now. That wasn’t too bad now was it.
Thank you for trying my tutorial, I hope you had fun. I certainly had fun putting all this together.
If you’d like to show me your results (I’d certainly love to see them) & would like me to showcase them here, just send me an email,
I hope for those with a little more experience in making tags that my tutorials are not too drawn out, but I remember when I first began to make tags & how some of the tuts were just too difficult for a newbie to follow along to.
I would like to thank Laura for allowing me to use her PTU kit in making this tutorial.
I used Windows live writer to write & post this tutorial to my blog. You can get a free copy of the programme for yourself by clicking here.
I use it all the time now, I think it’s brilliant.


No comments:
Post a Comment