Welcome to Tut your Funk out **smiles**
This is my blog for displaying the tutorials & tags that I make from scratch.

Having recently been chosen as one of Laura's creative team I will be making tag tutorials using the gorgeous scrapkits from Laura's Designz along with scrapkits made by myself which you'll be able to find on my scrapping blog here

I hope you'll find some tutorials here that you will have lots of fun following. I'm very very new to writing tutorials having only started in February of 2009.

I will be writing all of my tutorials in order to make it as easy as possible for those that are new to making tags. When I first began making tags about 6 months ago, I would hate that most tutorial writers assume the reader knows what they’re talking about. The upside to that of course is that I soon learned to make my own, my own way.

Of course although it's good to have tutorials to help you along your way, it's also a very good thing that you learn to do things on your own & in your own way, so by all means use your imagination anytime you wish to.
If you need to ask me any questions about any content on this site you can email me here

Thursday 23 July 2009

By request; Globe tutorial

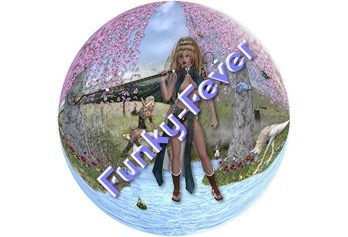
my globe

Hi, my name is Funky & I am the creator of this tutorial which was written on Thursday July 23rd 2009.

Resemblance to any other tutorial is purely coincidental.
I try to keep my tutorials set out for anyone new to tutorials to be able to follow along……a bit long & drawn out to those with more experience though *smiles* As usual I will be adding screenshots along the way……I do however assume that you’ll have at least some working knowledge of your programme.

All off site links will open in a new window, so when you've finished collecting your supplies, you can just kill that window & this page will still be open.

No outside filters were used in the making of this tutorial.

I’m using Corel paint shop pro x2.......a trial version can be downloaded here.

For this you will need one backdrop picture/scene. I’ve put one together which you can download with the supplies I have included. If you use a backdrop picture or scene of your own then make sure you have it re-sized to width 700 x height 469 & saved as a .png

Within the supplies; I’ve included a ready made bubble, a free to use tube which I got from AnitaLeeCreations & a ready decorated globe base for you to use.

You can download my supplies here

You’ll need a password which is   Globe-1

Any problems with the DL, you’ll find my email at the bottom of this post…..just drop me a line.

Okay honey bunnies, let’s hit this shall we.......

Other tutorial writers would no doubt do this differently……this is my way of doing it……**smiles**

Remember to save often.

Unzip your supplies & open up the  FF_Backdrop1 scene in your psp programme……..hold your Shift key down & press D to duplicate……now close out the original.

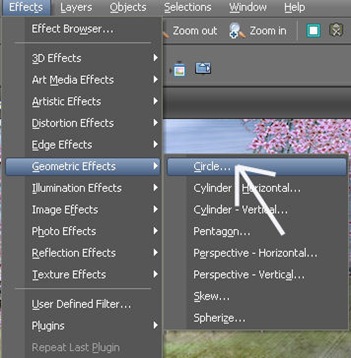
Go to “Effects – Geometric effects – Circle”  See screenshot below.

circle

You’ll now have your backdrop scene in a circular shape as I have below……your globe is beginning to take place.

Circular

Save as Globe.psp…….Okay now we want to place our tube on it before applying the bubble……if you’re using a tube of your choice then you may need to re-size it to fit. Width 328 x Height 355 is the size of my tube.

Open up the “EstelleMagica04-AL2009” tube…….Go to Edit – Copy then close that out & paste as new layer onto your Globe.psp

Grab your mover tool & place the tube where you think it looks right.

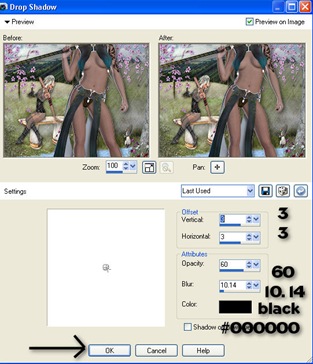
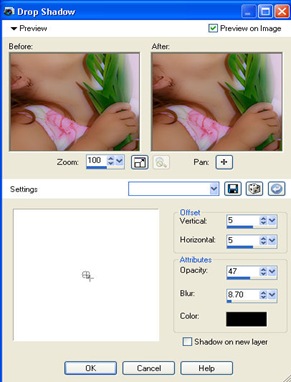
Apply a drop shadow using the screenshot below for a guide.

dropshadow1

dropshadow2

The settings are Vertical & Horizontal 3…….Opacity 60……Blur 10.14…….Colour black #000000

Click ok.

Go up to Edit & click Save

Now go to the layer palette on the right hand side of your programme & right click on any of the 2 layers…….from the flyout choose Merge – then Merge visible

merg

So far you’ll have the same as I have below.

sample

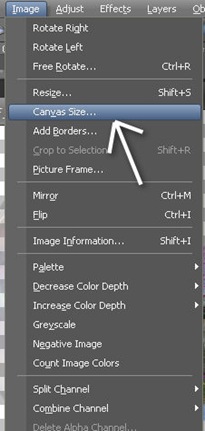
Now we want to make the canvas behind our globe a little bit larger so we can include a base. Go to “Image” - “Canvas size”

canvas size

Then follow instructions below

canvas sample

Width; 900 Height; 900 & click on the middle button where I’ve placed an arrow

You’ll now have your merged globe on a larger canvas & placed in the centre.

Right; now we’re going to apply the bubble on top of your globe before including a base……so go to the supplies & open FF_Bubble1

Edit – Copy & close that out as you’ve finished with that now.

Go to “Selections” – Select all.

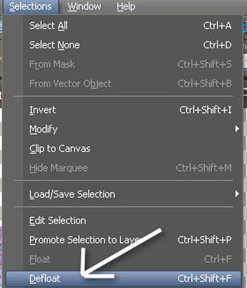
Back up to “Selections” select “float” then select “de-float”

select all

float

defloat

You’ll now have little running ants all around your globe as in the screenshot.

runants

Go up to “Edit” & down to “Paste into selection”

You’ll now have the bubble on top of your globe.png

Back up to “Selections” & choose “select none”

Go up to Edit & click Save

Okay we’re nearly done now.

Grab your mover tool & move your globe nearer the top of your canvas so you have room for the base.

All we need to do now is apply the base, a dropshadow & resize.

Open up FF_Globe base

“Edit” – “Copy” then close the base out

Back up to Edit & paste as new layer.

You may want to re-size the base to make it a little larger, that’s entirely up to you.

Grab your mover tool & move the base down a little bit to where you think it looks good.

Go to “Effects” – 3D & dropshadow then follow the screenshot I’ve included below making note of the arrow I’ve placed there, you want to tick that so you get the dropshadow on a separate layer as we’re going to rub some of it out.

dropshadow3

If you look over to your layer palette you’ll see that your dropshadow is on a layer all by itself.

shadowout

Now grab your eraser tool & apply the settings below,  or just click on the picture to see a clearer view of it.

rubber settings

Shape; circle…….size; 94……..hardness; 100………..step; 32…….density; 100………thickness; 100…….rotation; 0……opacity; 100

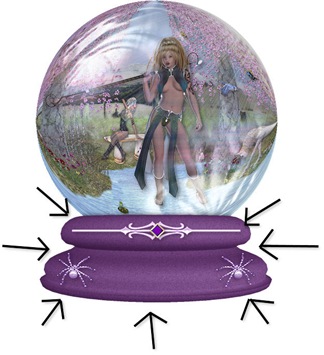
Now using the eraser tool just rub out the parts of the base that aren’t on the globe, I’ve placed arrows to guide you.

rubglobe

Take care not to rub out anywhere where the base meets the globe.

Merge all layers visible.

Select all - float – de-float then go to “Image” & down to “Crop to selection”

As one final step for what I think is a really nice effect is to add sunburst to the finished item…..obviously any steps you choose to follow during this tutorial is entirely optional.

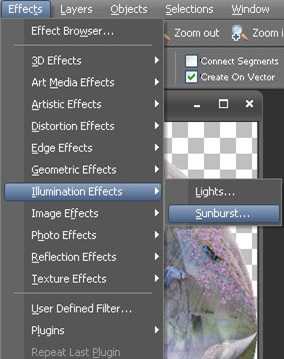
Go to “Effects” - “Illumination effects” - “Sunburst”

sun

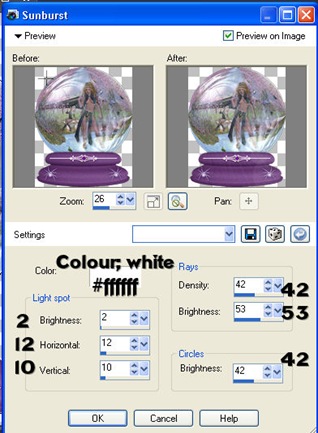
& apply the settings in the screenshot below

sunburst

That’s it sugar plums, you’re all done.

You’ll now want to save your globe as a .png so it has a transparent background.

The size of your finished globe is Width; 467 x Height; 577 you can re-size if you wish to…..one little tip though, if you want to re-size it up a bit then just do it slowly, like maybe 10 pixels at a time…..you may also find that sharpening it once helps……I’ve also included a screenshot in case you need help with that step :)

sharpen

Apologies if this tutorial seemed to go on forever but I like to think that even those new to psp are able to follow with ease…..sometimes because we know how to do things with our programme we take it for granted that there are those still very new to it.

Thank you for trying my globe tutorial, I hope you had fun. Please leave a message in my shout box to say you called by, it means a lot to me & encourages me to do more tuts.

If you have any questions about this or any of my other tutorials you can email me

 thefunky-punkshop@hotmail.co.uk . Feel welcome to show me your results if you like, I’d love to see them.

Take care, stay safe out there & as always ((hugs)) Funky xx

I used windows live writer to write & post this tutorial to my blog, you can download a free version here.

Wednesday 15 April 2009

Mum is magic in any language ~ Tutorial

FF_MumIsMagic_Laura

Hi, my name is Funky & I am the creator of this tutorial which was written on Wednesday April 14th 2009.

Resemblance to any other tutorial is purely coincidental.
I try to keep my tutorials set out for anyone new to making tags to be able to follow along……a bit long & drawn out to those with more experience though *smiles* As usual I will be adding screenshots along the way……I do however assume that you’ll have at least some working knowledge of your programme.

All off site links will open in a new window, so when you've finished collecting your supplies, you can just kill that window & this page will still be open.

No outside filters were used in the making of this tutorial.

I’m using Corel paint shop pro x2.......a trial version can be downloaded here.

You will need 2 tubes for this tutorial & a mask. The font I’ve used is called “Amaze”  ~ I have included all the supplies for you which you will find in the link below…..You will need a password which is ~ MothersLove

Get the supplies needed here;

I’m using the pay to use (PTU) Tagger sized “A Mother’s love” scrapkit from Laura at Laura's designz. You can get that from Laura's site.

Okay hunnie bunnies, let’s hit this shall we.......

Other tutorial writers would no doubt do this differently……this is my way of doing it……**smiles**

Un-zip the supplies ~ place the mask file into your mask folder in your psp files within your documents or wherever you keep your masks, open up the font & minimise that……your psp programme will pick it up when you’re ready to go with it.

Open both the tubes within psp, hold the shift key down on your keyboard & hit the letter D to duplicate both images separately, then close out the originals. Minimise the 2 tube images you have.

Open paper LD_AML_Paper_21

Shift key & D to duplicate……now close out the original paper.

I work straight from the duplicated paper & resize the tag when we’ve finished……it starts out at 800 x 800 so we have plenty of space to work on……I’ll refer to this as the tag template throughout this tutorial.

Go up to File & save your image as a .psp ~ remember to save your work often in case your psp programme shuts down for any reason.

Go up to Layers ~ Load/save mask ~ Load mask from disk

Find the “sg_double-floral-grungeframe2” mask in the little fly out box & follow the settings in the screenshot below.

mask

Over on your layer palette, right click on any layer & choose “Merge group”

We’re going to add a very slight drop shadow to it.

Go to Effects ~ 3D effects ~ Drop shadow & apply the settings in the screenshot below.

DropShadow3

Now we want to open LD_AML_Paper_13

Shift & D ~ close out the original ~ now apply the same mask to this image as you did before, not forgetting to merge the mask group together…….DO NOT apply a drop shadow to this though.

Image ~ Resize ~ Resize to 80% ~ all layers ticked

Edit ~ Copy ~ Paste as a new layer onto your tag template.

Close out that mask now as we don’t need it anymore.

Now I wanted the shade of the pink masked layer to be slightly lighter so I used my “Manual colour correction” tool to change it.

Now if you’re using psp x 12 as I am, you’ll probably not have this tool on show as Corel have placed it in the un-used commands section, so I’m going to show you how to get it out of there & onto your tool palette.

Go to View ~ customize. Now in the box that opens up you need to click on “Commands” then  “un-used commands” then scroll down until you find the “Manual colour correction” tool…..don’t worry, it’s very easy to do.

See the screenshot I’ve added below.

commands

See the little shoulders & head there? (I’ve pointed an arrow towards it) just grab that & move it over to the left of your psp programme & place it where ever you would like it to go with your other tools. Mine is as screenshot below.

tools

Now when you’ve done that, just click on the little head & a box will fly open. Right click where it says “Target” & your colour palette will fly open. Change the colour to #e8d1ee & click OK in the colour palette box. Now back in the manual colour correction box (which will still be open) click on the “Source” box. When the colour palette box opens again type in #c0c0c0 & click OK once more.

cp

Now click OK in the Manual colour correction box after you’ve changed both the target & the source colours & you will see that your pink mask has changed colour……..I love this tool & I use it a lot. We’ll be coming back to it a bit later to change the colour of the ribbon.

Go up to file & hit on save.

Open up LD_AML_1_Ribbon_3 ~ Shift & D & close out the original ribbon.

Go up to Image ~ Resize & resize by 50% making sure you have “re-size all layers” ticked.

Edit ~ Copy & paste as new layer onto your tag template.

Now grab your mover tool & move the ribbon to the top left hand of the tag template……you can close out the duplicated ribbon now as we’ve finished with that. Just click “NO” when the box opens up asking if you’d wish to save or not.

Right, now back on the tag template we’re going to change the colour slightly of the ribbon…….so click on the manual colour correction tool again (the little head & shoulders)

When the box flies open the settings will already be in place from before so just hit OK

Now how easy was that eh? you can see your ribbon too has changed colour.

Now we’re going to sharpen & add a drop shadow to the ribbon.

Adjust ~ Sharpness ~ Sharpen

Effects ~ 3D ~ Drop shadow & apply the settings in the screenshot below.

DropShadow4

Now go over to your layer palette & right click on the top layer (your ribbon image) from the flyer that opens up, choose “duplicate”

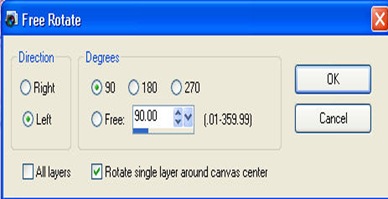
Your top layer will now say “copy of raster2” this is the layer we want to work with, so with this activated……go to Image ~ Free rotate & rotate left by 90 degrees……make sure the “all layers” box is left un-ticked.

rotate90

Your duplicated ribbon will now be vertical along the left hand side of the tag template……grab your mover tool & shift the ribbon up a little bit.

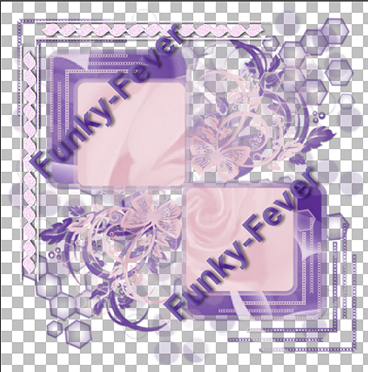
This is what you’ll have so far.

sample2

Minimise the tag template for a little while.

Now we’re going to work on the 1st tube, the little girl tube. So maximise that image & open the LD_AML_BIGHEARTFRAME from Laura’s kit.

Activate the little girl tube & highlight the middle layer (the one with the little girl on it)

Edit ~ Copy ~ Edit ~ Paste as new image…..you’ll now have the little girl on her own……Add a new raster layer & place this underneath the little girl.

Place #decae0 as your foreground colour in your materials palette & fill the new layer you just added with that colour.

Right click on any layer in your layer palette & choose “merge all flatten” from the flyer that opens up.

Go back to the LD_AML_BIGHEARTFRAME image ~ grab your magic wand tool & click anywhere within the heart, you will now have little marching ants going around the inside.

Selections ~ Modify ~ Expand & expand by 3 pixels.

Copy the little girl image ……. Edit ~ Copy then paste into selection on the heart frame.

Add a new raster layer & with the image still selected (the marching ants still active) we’re going to apply a cut out.

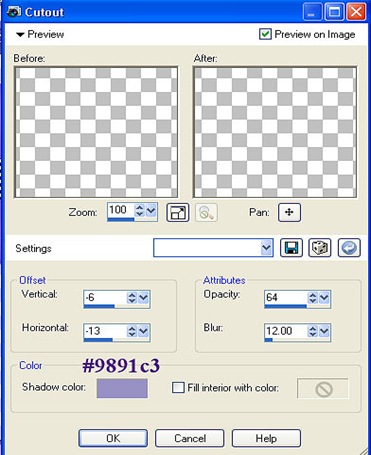
Effects ~ 3D ~ cut out. Apply the settings in the screenshot below & be sure to change the colour to #9891c3

cutout1

Click OK & add another raster layer…..now follow the next screenshot instructions for that. The settings may look the same but you’ll notice that the numbers for vertical & horizontal are now minus –6 & –13

cutout2

Selections ~ select none…..go to your layer palette & merge visible.

Edit ~ Copy & paste as a new layer onto your tag template…….now you can close out the framed image we just made as we’ve got that on our tag template & don’t need it anymore.

Right, now the framed image of the little girl we’ve just pasted is a little too big so we’re going to resize that to 70%

Image ~ Resize ~ Resize by 70……make sure all layers are un-ticked otherwise the whole tag will go smaller too & we don’t want that.

Adjust ~ Sharpness ~ Sharpen.

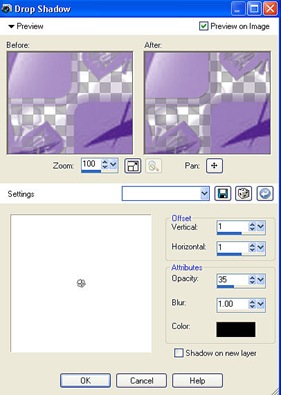
Edit ~ 3D ~ drop shadow & apply the settings below.

ds

Now add another drop shadow changing the vertical & horizontal to minus -5

Not far to go now hunnie bunnies *smiles*

From now on we’ll be relying less on screenshots as you’ll be getting the hang of this now.

Open the LD_AML_FlowerPot_1 image.

Image ~ Resize ~ Resize to 40% copy & paste as a new layer on to your tag template…………Move that to the bottom left hand corner of your tag.

Adjust ~ Sharpness ~ Sharpen

Effects ~ 3D effects ~ Drop shadow & apply these settings.

Vertical & Horizontal = 4; Opacity = 56; Blur = 8.70; Colour #000000 (black)

Now open up the other tube, the shoe one. Copy & paste as new layer on your tag template & close out the shoe tube.

Resize the shoe to 70% & move it to the bottom right hand corner.

Apply a drop shadow with the same settings as above…..the settings should already be in place so you just need to hit OK.

Open up the LD_AML_CloudTag_1 image & resize to 30%

Copy & paste as new layer. Place it at the bottom of the heart frame & apply the same drop shadow as before……now apply again but change the Vertical & Horizontal to  -2

This is what you should have so far.

sample3

File & hit save.

Open the LD_AML_CurledRibbon image, change the colour if you want by using the colour correction tool, I used the same settings that we used above……I also used it for the show but it’s up to you if you wish to, Resize to 30% ~ copy, paste as new layer & place it on the top right hand of the heart frame. Apply the same drop shadow as for the other elements..

Open the LD_AML_LFlower_1 image, copy & paste as a new layer then resize by 40%

Grab the manual colour correction tool again & apply the same settings as we applied to the pink mask at the beginning at this tutorial.

Move the flower to the top right hand corner & apply the same drop shadow as we’ve done before.

Now for the finishing touches……if you haven’t already done it, open up the “Amaze” font you got with the supplies & minimise it.

Add a new raster layer & grab your text tool with these settings.

In your background box of your materials palette put in colour #481583 & close off the foreground box…..now apply these settings.

font1 font2

Font=Amaze; Size=30; Units=points; Leave Bold,Italic & Underline as normal; Alignment=centre; Direction=Horizontal; Anti-alias=Sharp; Stroke width=0; Create as=Floating;

Now left click on the mauve tag at the bottom of the heart, we’re going to type whatever you want in here…….I’ve put Laura’s name as it’s her kit that I’m using but you can put what you want. If you have more letters or less in the word you wish to apply, you’ll need to alter the size of the font……when you’ve typed the name you want just click on “apply”

Keeping the text selected place your mouse over it until you see the mover tool come up……it has 4 little arrows pointing NSE & W. Grab your text & move it over to where you want it to be on the tag. Keeping it selected go up to Effects & then to Inner bevel. Apply the settings below.

bevel1

Image ~ free rotate & rotate left by 10 degrees & then apply a drop shadow of V & H =5; Opacity=56; Blur=4.35; Colour#000000 (black) go to Selections & hit select none.

Add new layer ~ grab your text tool again & along the top ribbon type in “Mum is magic”  ~ now apply the inner bevel as before ~ apply drop shadow but with the following settings. V & H =3; Opacity=46; Blur=1; colour #000000 (black)

Go to selections & select none……..now go to image & rotate left by 90 degrees. With your mover tool place the text along the left hand ribbon.

Add another layer & repeat the text for the top of the tag template, this time writing “In any language” apply the same inner bevel & drop shadow as before. Select none & move the text along the top ribbon.

Over on your layer palette, right click on any layer & choose merge visible from the flyer that opens up……now go to image ~ resize & with all layers ticked, resize following the settings below.

Resize3

Now go to Effects ~ illumination effects ~ sunburst & follow the screenshot below.

sunburst

Go to Selections ~ select all ~ float ~ de-float ~ Image ~ crop to selection…..file & save your tag as a .png if you want the background to be transparent…..if you wish it to have a white background then save as a .jpeg image.

There we go sweethearts, you’re all done now. Thank you for trying my tutorial…….I hope you had fun…..if you’re new to making tags I hope you learned something new today. If you would like to show me your results (I would certainly love to see them) you’re more than welcome to drop me a line here.

*I would like to thank Laura for allowing me to use her PTU kit in making this tutorial……Thank you sweetie……it was a gorgeous kit to work with.

I used Windows live writer to write & post this tutorial to my blog. You can get a free copy of the programme for yourself by clicking here.

The mask I used is called sg_double-floral-grungeframe2  & I got it from Sandie © Artwork by EssexGirl.

Take care, stay safe out there & as always ((hugs)) Funky xx

© funky-fever

Saturday 28 February 2009

Fairy princess tag tutorial

Fairy-Princess

Hi, my name is Funky & I am the creator of this tutorial which was written on Thursday February 26th 2009.

Resemblance to any other tutorial is purely coincidental.
I try to keep my tutorials set out as simply as possible for anyone new to making tags to be able to follow along. As usual I will be adding screenshots along the way.

All off site links will open in a new window, so when you've finished collecting your supplies, you can just kill that window & this page will still be open.

Supplies needed;

I am using Corel paint shop pro x2.......a trial version can be downloaded here.

No outside filters or masks were used in the making of this tutorial.

I am using the pay to use (PTU) Tagger sized KACI’S CASTLE scrapkit from Laura at Laura's designz. You can get that from Laura's site.
The tube is a FTU tube which you can collect that here  It comes in a .psp file with 2 layers, be sure to hold onto the top layer as we’ll be adding that after the tag is completed in order to give proper credit. If the tube is one of yours & I shouldn’t be offering it as part of my supplies, please email me & I’ll correct it.

The font is called Fairytale which you find in my supply zip….. just have that opened up & ready for when we want to use it. I wouldn’t install it into your PSP programme as the more fonts you have installed, the slower your programme will run.

Okay hunnie bunnies, let’s hit this shall we.......

This isn’t actually a difficult tag to make it just looks like loads of instructions because of the screenshots included.

Open a new image size 700x560…….this gives us plenty to work from & we can resize later.

Go up to File & save as a .psp file  – remember to save often so you don’t lose your work .

Open paper “LD_KC_Paper_1” into your psp programme.

Edit – Copy…..close off that paper.

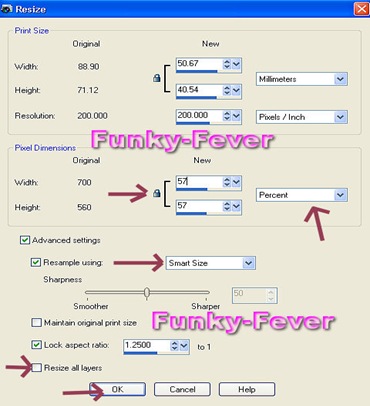
Back up to Edit – Paste as new layer – Image – Resize – Resize to 57% with “all layers” UN-ticked. Smart size selected. See screen shot below.

Image17

Image – Free rotate – Rotate left by 30 & hit OK……see screenshot below for settings.

Image4

Effects – Texture effects – Mosaic antique.

Symmetric ticked – Grid settings – 41; Tile diffusion – 37; Grout width – 1; Grout diffusion – 50; Hit OK

Image6

Adjust – Sharpness – Sharpen

Effects – 3D – Drop shadow & apply the settings below.

Vertical & Horizontal – 3; Opacity – 53; Blur – 10.14; Colour black (#000000) Hit the OK button.

Image13

Open LD_KC_Paper_13

Edit – Copy, then close that paper out.

Edit – Paste as new layer – Image – Resize – 50% with “all layers” UN-ticked

Effects – Texture effects – Mosaic antique…..just hit the OK button as the settings will already be in place from before.

Up to Adjust – Sharpness – Sharpen

Apply the same drop shadow as you did for the first paper.

File – Hit Save

Open LD_KC_RoundFrame1

Edit – Copy & close off the frame.

Back up to Edit – Paste as new layer.

Image – Resize – Resize to 40%

Adjust – Sharpness – Sharpen

Now grab your mover tool & move the frame to the top left hand corner…….Check the screenshot included below if you need to.

Image8

Grab your Magic wand & apply these settings.

Image9

Mode – Add shift; Match mode – RGB Value; Tolerance – 0; Use all layers – UN-ticked; Contiguous – ticked; Feather – 0; Anti-Alias – ticked.

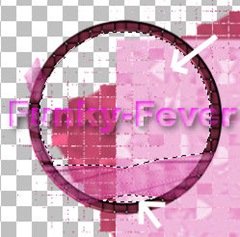
Now still working on the LD_KC_RoundFrame1, use your magic wand to click inside the frame so you get what looks like little marching ants…….at the bottom of the frame you’ll notice that there aren’t any marching ants there, so click on that part as well.

Image11

Now go up to Selections – Modify – Expand by 1 pixel, then hit the OK button

Open up LD_KC_Castle_1

Edit – Copy & close out the Castle image.

Back up to Edit – Paste into selection.

Selections – Select none.

Effects – 3D – Drop shadow with the settings below.

Vertical & Horizontal – 2; Opacity – 40; Blur – 5.00; Colour – black (#000000)

Image15 

File – Hit save.

Now we want to open the tube you’ve chosen to use. If you’ve chosen to use the same as me then once you’ve opened it, go to Edit – Copy – minimise that tube now as we’ll be coming back to that later on when we’re ready to add the credit on your finished tag.

Edit – Paste as new layer

Up to Image – Resize – Resize to 40% All layers UN-ticked.

Adjust – Sharpness – Sharpen

Apply the same drop shadow that you applied to the frame above.

Grab your mover tool again & bring your tube down to where I’ve placed mine just in the bottom left hand corner.

Open up LD_KC_Dragon_2

Edit – Copy & close that image out.

Edit – Paste as new layer.

Image – Resize – Resize to 40% remembering to have all layers UN-ticked.

Adjust – Sharpness – Sharpen

Apply the same drop shadow as you did to the tube & frame above.

Vertical & Horizontal – 2; Opacity – 40; Blur – 5.00; Colour – black (#000000)

Open up the LD_KC_HEART WAND image – go to Edit & hit on Copy, close that image out.

Edit – Paste as new layer

Image – Resize – Resize to 40%

Adjust – Sharpness – Sharpen

Apply the same drop shadow as above, then grab your mover tool & move the image to the bottom left hand corner as in the screen shot supplied.

Image19

Open the LD_KC_MAGICAL_WORDART image

Edit – Copy & close out that image.

Edit – Paste as new layer

Image – Resize – Resize to 40% all layers UN-ticked

Image – Free rotate – Direction – Left by 17 with all layers UN-ticked.

image20

Adjust – Sharpness – Sharpen.

Effects – 3D – Drop shadow & just hit OK as the settings will already be in place from before.

Grab your mover tool & move it to the top right of your circular frame.

Go to File & hit the save button.

Open the LD_KC_CROWN_1 & close out that image.

Back up to Edit & paste as a new layer.

Image – Resize – Resize to 30% all layers UN-ticked.

Adjust – Sharpness – Sharpen.

Effects – 3D – DropShadow – just hit the OK button as the settings are already in place from before.

Now grab your mover tool & position the crown on top of the letter M. See screen shot.

Now we’re going to add the fairy, you can choose which one you’d like here but I used LD_KC_PRINCESS_2

Edit – Copy – close out that image.

Back up to Edit & paste as new layer.

Image – Resize – Resize to 20% all layers UN-ticked.

Adjust – Sharpness – Sharpen.

Effects – 3D – DropShadow – apply as before.

Open the LD_KC_GLASS SLIPPER_4

Edit – Copy – close out that image.

Back up to Edit & paste as a new layer.

Image – Resize – Resize to 20% all layers UN-ticked.

Apply the same drop shadow as before.

Grab your mover tool & move your glass slipper to where I’ve placed it in the screen shot below.

Image21

File – save

Open the LD_KC_BUTTERFLY_4

Edit – Copy & close it out, back up to Edit & paste as new layer.

Image – Resize – Resize to 50%

Adjust – Sharpness – Sharpen.  Add the same drop shadow as we’ve been applying all along & with your mover tool place it in the right hand corner of your tag. Now you want to open the LD_KC_BUTTERFLY_2 & copy it before closing it out.

Go back up to Edit & paste as a new layer.

Image – Resize - Resize to 40%

Sharpen & apply the drop shadow as before.

Position that just under the first butterfly then open up & copy the LD_KC_BUTTERFLY_3 then close that image out. Back up to Edit – Copy & paste as new layer.

Image – Resize & resize to 30%

Sharpen & apply the drop shadow. Then place it just under the the last butterfly you did.

Image22

Phew! we’re nearly done now **giggles**

Open the LD_KC_ROSE_2 & copy it before closing it out, then paste as new layer ready to resize to 35% – Sharpen & apply the drop shadow as before.

Place it next to the dragon so the rose is falling just under his nose.

Open & copy the LD_KC_HEARTBUTTON_2 Close it out & paste as new layer. Resize to 50% & rotate it by 17 to the left – Sharpen & apply the drop shadow. Place it at the tip of the rose stem.

Open & copy LD_KC_HEARTBUTTON_3 & paste as new layer.

Resize to 40%, Sharpen & apply the drop shadow

Open & copy LD_KC_CRYSTAL_1

Paste as new layer & resize to 10%

Sharpen & apply the drop shadow then place it on the two hearts.

Open the last element LD_KC_FAIRYPRINCESS_WORDART

Copy & paste as new layer – resize to 40% – Sharpen & apply the drop shadow then place it at the foot of the dragon.

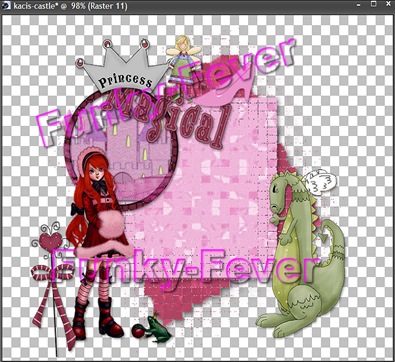
Maximise the tubed image we used & copy the top layer, then paste as new layer onto your tag. Resize by 60%, rotate to the left by 90, Sharpen & apply a drop shadow. Position it to the left of the tube. See screen shot for what you should now have.

Image23

Layers – add a new raster layer.

Now we’re going to add the name you’d like on your tag.

Grab your text tool & follow the settings in the screen shot provided.

Image24

Right click on your tag & write the name you’d like in the little box that flies open, click apply. Go to image & rotate by 22 – Selections – select none – Sharpen – Apply the drop shadow that we’ve used all along. Move the name to where you would like it to be. Now close off the font that you’ve had opened up as we’ve finished with that.

Go to your layer palette & on any layer – right click, then on the options that fly open, choose merge – merge as visible.

Now up to Selections – Select all – Float –   image – Crop to selection.

File – Save as a .png for an invisible background.

That’s it guys, you’re all done now. That wasn’t too bad now was it.

Thank you for trying my tutorial, I hope you had fun. I certainly had fun putting all this together.

If you’d like to show me your results (I’d certainly love to see them) & would like me to showcase them here, just send me an email,

I hope for those with a little more experience in making tags that my tutorials are not too drawn out, but I remember when I first began to make tags & how some of the tuts were just too difficult for a newbie to follow along to.

I would like to thank Laura for allowing me to use her PTU kit in making this tutorial.

I used Windows live writer to write & post this tutorial to my blog. You can get a free copy of the programme for yourself by clicking here.

I use it all the time now, I think it’s brilliant.