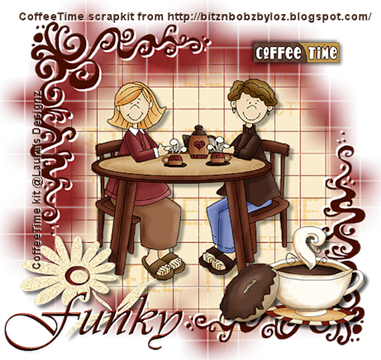
Coffee morning with friends tag tutorial.
 |
Hi, my name is Funky & I am the creator of this tutorial which was written on Saturday February 21st 2009.
I’m writing this tutorial in a way that will help anyone that is new to making tags, hence the screenshots. Also as it’s the very first tutorial that I’ve ever written, I’m keeping the tag simple too. **smiles**
Resemblance to any other tutorial is purely coincidental.
I work in PSP x2.......I don't have any other versions of the programme I'm afraid so I couldn't tell you if it works in any other apart from the one that I'm using; I'm guessing it would work in most, but if you are very new to making tags & you're using an earlier version, be aware you may find that some of the commands are in different locations to the screenshots supplied here. **smiles**
Supplies needed;
I am using Corel paint shop pro x2.......a trial version can be downloaded here.
I am using the pay to use (PTU) Tagger sized COFFEE TIME scrapkit from Laura at Laura's designz. You can get that from Laura's site.
The Mask is from WeeScotsLass. WSL_Mask84 which can be downloaded from here
All off site links will open in a new window, so when you've finished collecting your supplies, you can just kill that window & this page will still be open.
Okay hunnie bunnies, let’s hit this shall we.......
When making a tag, I just work off of the first paper that I open up (assuming it’s a tagger size kit of course)…..in other words I don’t open a new blank image.
Navigate to where you have saved your COFFEE TIME KIT & open paper “LD_CT_Paper26” into your psp programme. Hold down your shift key & hit the “D” key in order to duplicate, then close off your original paper…….I don’t work on the original in case something happens & I end up losing it…
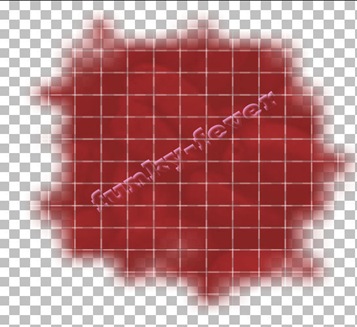
Layers - load/save mask - Load mask from disk. Find the “WSL_Mask84” & follow the settings set out below
SETTINGS; *Source luminance, *Fit to canvas, *Show all mask, *make sure invert transparency is UN-ticked, then hit the “Load” button, see picture below to see what you will now have.
 |
Right click on the top layer in your layer palette & from the flyer that opens up choose “Merge” then “merge group”
Adjust – Sharpness - Sharpen
File – Save as a psp file
Now navigate back to your COFFEE TIME KIT & open up the LD_CT_paper14 – Edit – copy…….. close out the paper as you have finished with that.
“Layers” - “new raster layer” ……..Selections - Select all – Edit & down to - paste into selection
Selections – select none……. see screenshot below to see what you should now have.
 |
Layers - load/save mask - Load mask from disk…..hit the load button as the settings will already be in place from before.
Right click on the top layer in your layer palette & from the flyer that opens up choose Merge - Merge group
Still in your layer palette, highlight the bottom layer. Go up to Image – resize – 120% - make sure “resize all layers” is un-ticked……Highlight the top layer in your layer palette, grab your mover tool & working on your image, move the top image (LD_CT_paper14) slightly down & over to the right.
Adjust – Sharpness - Sharpen
 |
File – Save.
Open up your first element. LD_CT_COUPLE_1
Edit – copy & close that image out………back up to Edit then hit “Paste as new layer”
Remaining on the top layer go up to images – resize – resize to 60%
Adjust – Sharpness – Sharpen
Effects – 3D – Drop shadow & apply these settings
Vertical – 6; Horizontal – 6; Opacity – 35; Blur – 5; Colour – Black (#000000) & hit OK
Open LD_CT_CornerSwirl_1
Edit – Copy, then close that image out…….back up to Edit then paste as new layer.
Image – resize – 60%……..Adjust – Sharpness – Sharpen
Effects – 3D – Drop shadow & apply the following settings.
Vertical – 3; Horizontal – 3; Opacity – 100; Blur – 0; Colour – white (#ffffff) & hit OK
Grab your mover tool & move the (LD_CT_CornerSwirl_1) to the top left corner, Go over to your layer palette & right click on the top layer…….from the flyer that opens up, choose- Duplicate.
Go to Image – Mirror – Image – Flip……you should now have what I have in the screenshot below.
Go to File & hit save.
Now you need to open up your next element.
LD_CT_CoffeeCupandDonut
Go up to Edit – Copy, then close out that image.
Back up to Edit – then hit paste as new layer.
Image – Resize – 27%
Adjust – Sharpness – Sharpen
Effects – 3D – DropShadow using the following settings.
Vertical – 6; Horizontal – 6; Opacity – 67; Blur – 7; Colour – Black (#000000)
Now grab your mover tool & move the LD_CT_CoffeeCupandDonut down to the bottom right hand corner.
File – hit save.
Open the LD_CT_SwirlFlower_4
Go to Edit & hit copy, then close that image (LD_CT_SwirlFlower_4) out.
Edit – Paste as new layer
Image – Resize – 46%
Adjust – Sharpness – Sharpen
Effects – 3D – DropShadow using the following settings.
Vertical – 5; Horizontal – 5; Opacity – 51; Blur – 7; Colour – Black (#000000)
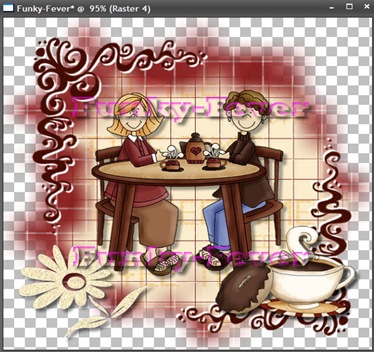
Grab your mover tool & move this down to the bottom left hand corner. See the screenshot below to see what you should now have.
Go to file & hit save.
We’re nearly done on this now, I did say it was an easy one **giggles**
Grab your last element which is LD_CT_CoffeeSign_2 & open that, go up to Edit & hit copy, then close out that image.
Go back up to Edit – then hit Paste as new layer.
Image – Resize – 13%
Adjust – Sharpness – Sharpen
Effects – 3D - DropShadow with the following settings.
Vertical – 3; Horizontal – 3; Opacity – 51; Blur – 7; Colour – Black (#000000)
Repeat the drop shadow but this time change the Vertical & Horizontal settings to –3 (minus 3)
Go to Layers – new raster layer. We’re now going to add the name, obviously you’ll put the name of your choice in here. The font I have used is called Vivaldi which comes with your PSP programme.
Now grab your font tool & alter your settings to what you see below..
Font – Vivaldi; Size – 38; Bold; Centre alignment; Anti alias - Sharp; Create as – Floating.
NOTE; If your name is longer than mine, you may want to alter the font size to suit.
Now go to your materials palette & change the colour in your background box to #4a1001 or choose the colour you prefer, close off the top box.
Left click anywhere on your image & write the name you’d like to include into the box that opens up then hit apply.
Selections – Defloat.
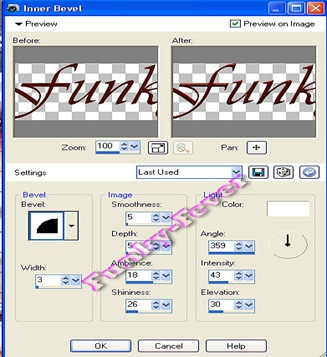
Effects – Inner bevel & follow the settings in the screenshot below
Bevel - #2; Width – 3; Smoothness – 5; Depth – 5; Ambience – 18; Shininess – 26; Angle – 359; Intensity – 43; Elevation – 30; Colour – White (#ffffff)
Adjust – Sharpness - Sharpen
Effects – 3D –DropShadow & apply these settings.
Vertical – 2; Horizontal – 2; Opacity – 100; Blur – 0; Colour – White (#ffffff)
Selections – Select none.
Now grab your mover tool again & place the name where ever you would like it to go.
Go to your layers palette & click on any layer, then from the flyer that opens up, choose merge - merge visible
Image – Resize – Resize all layers by 80%
File – Save as .PNG
That’s it, all done, I said it was a simple one didn’t I?
Thank you for trying my tutorial, I hope you enjoyed doing it, if you want to show me your results…..I would love to see them, you can email me here
NOTE; Now as you can see I like to add quite a drop shadow to my work because I feel it emphasizes it a lot more, however if you don’t like it so heavy, just drop the Vertical & Horizontal settings down a bit lower,
If you enjoy scrapping & would like some freebies, you can visit my scrapping blog here.
Take care, Stay safe out there & as always ((hugs)) Funky xx
Thank you to Laura for allowing me to use her kit to make this tag. Thanks hunnie bunnie, you know I love ya loads **smiles**


1 comment:
WOW hunni you have nailed your first tutorial babe and what a tag!! Looking fab babes, all your hard work has paid off.....well done sweetie i'm sooo proud of you!! All my Love Laura xoxoxoxoxox
Post a Comment